The deep cut blade has a 2 mm long blade.

Silhouette is recommending that the deep cut blade should only be used with the Curio, but since the blade holder on the Cameo and Curio are the same size, which is obvious because you can use the regular blade housing in the Curio, you can use the deep cut blade in the Cameo.

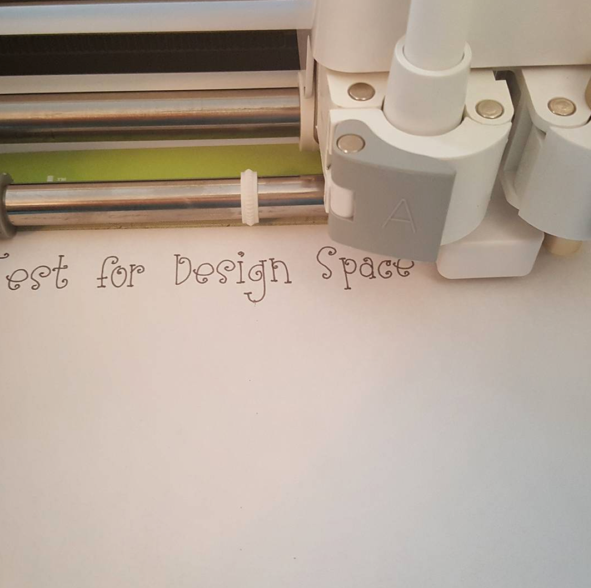
Make sure the material you're cutting clears the white rollers on the two sides to make sure that the rollers do not create an indent in your material or interfere with the material moving through the machine in any way. If you don't do this, your mat could be pushed around and your cut would not work out as expected. You will see this happen in my video below.

The blade depth on the deep cut blade housing goes up to 20. There are two bands of numbers. The first goes from 1 to 10 and represents the settings you are already familiar with. The second band of numbers goes from 11 to 20 and represents deeper settings for thicker materials.

If you can see the blue portion at the bottom of the blade housing, the blade depth indicator is pointing to the 1 to 10 (lower) settings. In the image below, you can see the blue portion and this means that the indicator is pointing to a blade depth setting of 3.


In the next image, you don’t see the blue portion at all so the blade depth indicator is point to the 11 to 20 (higher) settings. In this case, the blade depth setting is 13.

You don't need the ratchet to change the blade depth on the deep cut blade housing. You can turn the blade settings with your hands. Grasp the deep cut blade housing and turn.

Below are the materials I tested with the deep cut blade in my Cameo. Note that every machine is slightly different so your results may not match my results exactly, but by testing materials with small designs with your machine, you will be able to determine the optimum settings for your machine. 

For all materials, I used a blade depth of 20, speed of 5 and thickness of 33. 

You can use my settings as a starting point and then create your own custom settings in the software once you find the right settings for your machine.

Below are images of my calipers for measuring the thickness of each of the materials


0.27 mm


1.31 mm


1.98 mm


0.48 mm


0.48 mm

Below is my video in which I take you through cutting all of these materials and more.


Take the CB09 blade holder apart completely.
Place the blade into the main part of the blade holder. There is a magnet at the bottom.

Place the spring over the blade.

Place the black cap carefully over the blade and spring being careful not to hit the blade on the sides of the inner gold portion.

Screw the black cap back on.

Twist the silver end to make the blade protrude as much as you want (see tip below).

This is how much my blade protrudes and I never have to change the physical blade setting. All I do is change the blade setting in the software. With this, vinyl weeds beautifully and all materials cut like butter.


Here is how much my blade protrudes from another angle.

Tip: Turn the silver end all the way to the left until the blade doesn't protrude at all. Set your regular ratchet blade (the one that came with the machine) to the number you usually set it for patterned paper or card stock (3 or 4). Now hold the ratchet blade next to the CB09 blade holder and turn the silver end until the blade protrudes the same amount on both.

You should be good to go, but you might need to run some test cuts to be sure you have the right setting. Once you have the right setting, you will love your new blade holder.

You can purchase 30-degree (for thin materials like vellum and vinyl), 45-degree (all purpose) and 60-degree (thick materials) blades for your blade holder.

Regular material blades are the 45-degree blades. These are at http://amzn.to/1gmu0Tz


Deep cut blades are the 60-degree blades. These are at http://amzn.to/1IKrXFe


Thin material blades are the 30-degree blades. These are at http://amzn.to/1gmuclG


Here is a video on placing the blade holder in your Silhouette. Note that there is no fin on this blade so how you place it in the mechanism doesn't matter.


If you do need to take the clamp off, do not stretch the mechanism. You only want to loosen it a tiny bit. If your blade holder won't fit in, don't force it. You don't want to stretch the mechanism out of shape.

In this case, you will need to sand your blade holder down to fit.


I am publishing this blog post again because people are constantly asking for this information.

This post contains a tutorial on accessing the special glyphs (extra characters) in the Samantha font, which you can still get on sale. (just click the link and then type "samantha" in the search box)

The easiest way of all is to use SCAL4 (Sure Cuts a Lot) because the font viewer displays all of the available characters and all you need to do is click the characters you want.


This capability is available in the Mac and PC versions of the software. For more information on Sure Cuts a Lot, join us in my Facebook group.

If you do not have SCAL, there are other ways you can access the special characters. If you have Illustrator or CorelDRAW, this video shows you how you can access them very easily.


If you have none of these software programs, you will need to follow the procedures described in the FAQ on Laura Worthington's site (under How do I?).

This procedure only works with fonts that have been coded to be compatible with character map. The latest version of the Samantha font has been coded by Laura Worthington to be compatible with character map. If you have an older version (you will know this if the procedure doesn't work), contact the designer, Laura Worthington, and ask her to send you the updated version of the font. You will have to provide proof of purchase.


Please disregard the strange mailing you received from me earlier today.

I was setting up the RSS feed for my blog and unfortunately, I clicked a wrong button before I had finished setting it all up.

From now on, you will receive a mailing whenever I post something new on my blog.

Thanks so much for your support.

Karin


There are some very simple steps you can use to turn an OK picture into one that gets noticed and helps your business.

This is the actual design I used to apply for a design team position. I was applying at the last minute and also needed to do some other things so I was rushing a bit. I was about the send the inset picture with my application, but then I decided that I needed to take the time to make my photos look better. I actually remade the button holder because I had pulled out the brads I originally used to put them back into storage.

If you're interested, I used Lori Whitlock's For the Record 2 collection by Echo Park. I am not a floral person, but I absolutely love this floral. It's an older collection, but you might have it in your stash too.

It honestly doesn't take much and anyone can learn. You don't need to use expensive software or cameras. I use Lightroom to edit and manage my photos, but the techniques I used are available in all photo editing programs, including free online programs.

I took the actual photos with my Canon T3i DSLR, but I took a screen shot of the photos on my computer, then took screenshots with my phone from where I saved them online and used the Pixlr app on my Samsung Galaxy phone to create the collage above. I then sent it to Instagram, applied a vignette to the collage and here is the result.

Etsy shops with professional looking photos sell more than shops with OK or lousy photos. After all, this is your only chance to show the world what you're selling. It only makes sense to use the best photos you can.

For my staged photo, I adjusted the white balance, increased the exposure, increased the clarity (contrast), sharpened and cropped the image. These photography terms might sound foreign or intimidating to you, but they really are simple.

White balance is simply an adjustment that corrects the colours in the photos by choosing a neutral area of the photo. Exposure is the amount of light in the photo (this is what you use to lighten photos that are too dark.) Clarity or contrast adjusts the dark and light areas where they meet to make the photo pop more. Sharpness adds definition. Cropping means removing parts of the image you don't want.

If you want to learn more about improving your photos, you should look into the courses offered by CreativeLive. This is where I learned these techniques and I am by no means a professional photographer.

This post contains affiliate links. Please refer to my page on this for more info.
http://misskatecuttables.blogspot.ca/


Guess what!!!!

I made the cut ... I have been selected as a guest designer for Miss Kate Cuttables.

This will be a lot of fun because their designs are so darned cute. You may have noticed that I remind you about their daily freebies every day on my Best Crafting Deals page and on my personal page as well.

I have been collecting all those freebies because I plan to do some challenges in my groups with these cutting files and I hope you will join along. Be sure to check my pages above every day to get these beautiful free files.

Below are images of recent cutting files. These are no longer available for free, but you can purchase them if you miss them on the freebie day for only 50 cents!


My post as a guest designer will only be in August, but in the meantime, be sure to follow the blog so you can see all the great ideas all the other designers have.


Did you know that thin fonts from Lettering Delights can be used in Design Space to write with your Cricut Explore?

Lettering Delights thin fonts can be used in Make the Cut to create designs that you can save in SVG format and upload into Design Space which you can then write with a pen or marker using your Cricut Explore.

(note that you can click all the images below to see more detail)

I clicked the Import Font File icon in the top right corner and then chose the .opf file from my directory.


To save as an SVG file, the design must be selected.
In Design Space, I changed the line attribute to Write


You can test the file I created for yourself. You can download the Test for Design Space file in SVG format by clicking here.

This video teaches you how to upload SVG files into Design Space: