It took all afternoon to create this cutting file, but I am thrilled with the result. Next week, I plan to raid my local dollar stores to find clear cutting boards so that I can decorate them with this design. The cutting boards will be Christmas presents for friends.
Once I find some, I will make a video on how this is done. In the meantime, I have added this cutting file to my Etsy shop.
I am selling this file for $1.99 because it did take quite some time to get just right.
In honour of Breast Cancer Awareness Month, the giveaway for this month is my Split Regal Ribbon to 10 members of the Cutting Edge Designs group. You must be a member of the group to win.
Enter the draw below. The 10 random winners will be selected Friday night, October 24 at midnight and announced the next morning.
It can be really difficult to remember the colours for a project you purchased from the Silhouette Store. It can be impossible to figure out where pieces go once you have your cutting files on the mat.
There is a very easy solution to this.
First you need to choose the project you want to work on.
Double click the file you want to make to put the cutting files on your mat.
Now all the pieces are on the mat, but I can't remember what colours they were. For more complicated projects, it can be difficult to remember where pieces are supposed to go and how you are supposed to put the project together.
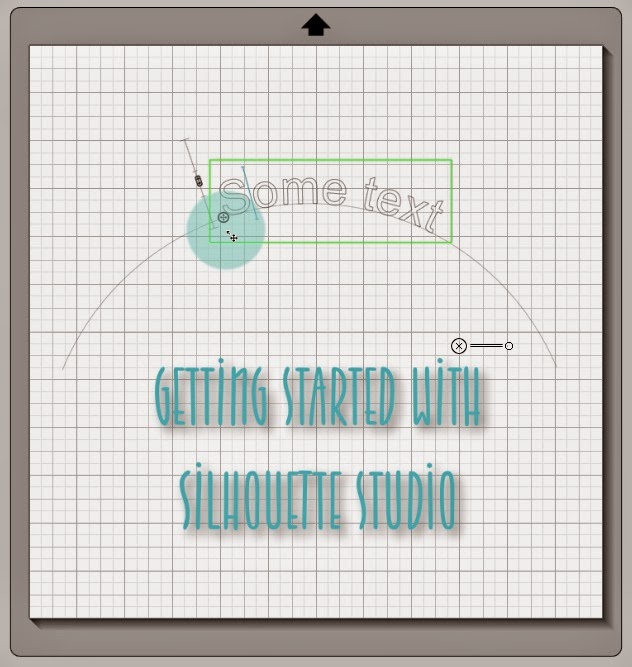
To see the picture of your project as it appears in your library or in the Silhouette Store, bring your cursor close to the left edge of the screen in Silhouette Studio, so that it is on the line that separates the working area from the sidebar that contains all the icons.
Wait until the cursor changes shape to a double headed arrow. Once it changes shape, click and drag the line until you can see pictures of projects from the library.
You can drag it out as far as you like. You may need to scroll up and down through the window to find the image of the project you're making. Once you let go, you will have the window showing the picture of your project on the left and your pieces on your mat so that you can figure out what should be cut from which colours and where pieces should go.
If you want to close the window that contains the pictures, you can just drag it back the same way you dragged it open or click the X at the top of that window.
Some of you have expressed an interest in checking out the new Cricut Explore. What better reason to have a giveaway and let one lucky winner enjoy this gorgeous new machine.
So what is there to get so excited about with the Explore? Well, for one thing, we will have an iPad app that will let us create any project we like in Design Space, save and either cut from the iPad (with the bluetooth adapter) or cut from Design Space on your computer (for which the bluetooth adapter is not necessary).
The iPad app is to be released during the week of December 10. The beta testers are hard at work checking everything out and reporting back to make sure it's flawless by the time you get your hands on it.
There is so much more to be excited about, like the ability to cut very thick materials, the incredibly easy Print then Cut system and much, much more, but you can find all that out when you enter the giveaway because one of the things you will need to do is join our I LUV my Cricut Facebook group.
We want to increase the number of members in our group so you can all experience the excitement and level of support we have been enjoying for some time.
If you would like to be able to watch all of my videos and tutorials on my YouTube channel without advertising, you can do that now. This video explains how.
In this video, I explain how you can create basic shapes, how to set preferences for shapes in the software, how to set preferences for selecting items and how to save files to your hard drive and to the library.
The
classes start with the basics of what you should think about at the
very beginning. How do you want to use your Silhouette? Do you hope to
start your own small business? Do you want to make layouts and cards? Do
you hope to make your own designs and sell them?
I
will show you how to install the software, how to set up defaults and
preferences, and then bit by bit, we will go through the basic steps and
I will teach you what you need as we move ahead to more advanced
projects.
I will repeat steps so that you really understand what I am showing you.
All
of the classes and tutorials will be FREE on my YouTube channel, but
this Getting Started series will be organized and numbered so you will
know exactly what you should watch next in order of complexity.
More videos will be added to the series regularly, in addition to many new tutorials.
My
recent videos on applying vinyl to a Christmas ornament and on re-organizing my kitchen pantry show you how versatile the Cricut Explore really is. It can cut the thinnest materials, such as vinyl, vellum and
copy paper, to the thickest materials you will use in crafting, such as
shrink film, acrylic, heavy chipboard, ripple board, poster board, foam
and cork.
Silhouette claims the Cameo can cut chipboard, but the
material they sell as chipboard is actually a medium weight kraft card
stock. I have had some and was very disappointed.
In any case, this video clearly shows you that the Cameo is incapable of cutting the thinnest material I show here.