I cut this 1.5" rosette with my KNK Maxx and posted a video on YouTube with a trick for assembling rosettes so that they don't split apart when you're assembling them.

You can download the SVG cutting file here. Note that you will probably need to resize the file once it opens. I find it works best at a 1-1/2" width.

Here is the video:

Here are some of the Christmas cards I made recently.

I used various paper collections and played around with cuttings using my Silhouette and Cricut machines, as well as punches and pieces from my stash. I keep a project box for Christmas in which I keep all papers and embellishments with a Christmas theme so that I can mix and match easily to put cards together.


I also filmed a video to show you how to stamp onto acrylic without your stamp sliding on the acrylic and messing up your image. I also explain how I store my acrylic stamps.


I worked on this layout while at a friend's house this week.

The photo is of my husband, his cousin and her daughter during his cousin's visit to Montreal in the summer of 2009. The reason for her visit was the Stevie Wonder concert at the Jazz Festival, which we all thoroughly enjoyed!!!

Her daughter was studying to become a pharmacist at McGill at the time ... she has since graduated.


The setting for the photo is a beautiful area beside the rapids on the St. Lawrence River in Lasalle, Québec.

I used the Basic Grey Origins collection for this layout. I also used my Gypsy and the Elegant Edges Cricut cartridge to cut the shapes behind the photo and the shape on the border with the date block. I used the Nifty Fifties cartridge to cut out the word "family".

It's funny because I was not crazy about this paper line when the owner of a LSS showed it to me at first, but it grew on me over time.
My studio is coming along. We have had a bit of a setback in that paint matching was a disaster (long story) so I am going to have to repaint the whole room on Sunday, but after that, it should be full steam ahead.

All my furniture is here and most of it is assembled. I am really looking forward to getting my stuff moved in so I can start to play in there!!!! The basement is a total disaster now of course.

Here are some pictures of the room now. I hope to post pictures of the finished room very soon!!!

The plan is for my husband to build a shelf that will hold my Cricut and Silhouette cutters in this closet. My KNK Maxx will probably be placed on an a rolling Ikea drawer set.

 This is my large Expedit unit.

 This photo shows my JetMax cubes that are not yet assembled and a stamp pad rack I purchased online from a supplier in Ontario. I will be painting the stamp pad rack white.

 This is my small Expedit unit that is behind my door. Beside it will be a long white table for stamping, sewing and other detailed work. The table will be beside a window so I can take advantage of the natural daylight.

 This photo shows my Making Memories embellishment centre, the two table tops that will be my main work surface and some paper racks that I purchased from a LSS that was closing. Another long white table will go against this wall on which I will have my computer and video making equipment.

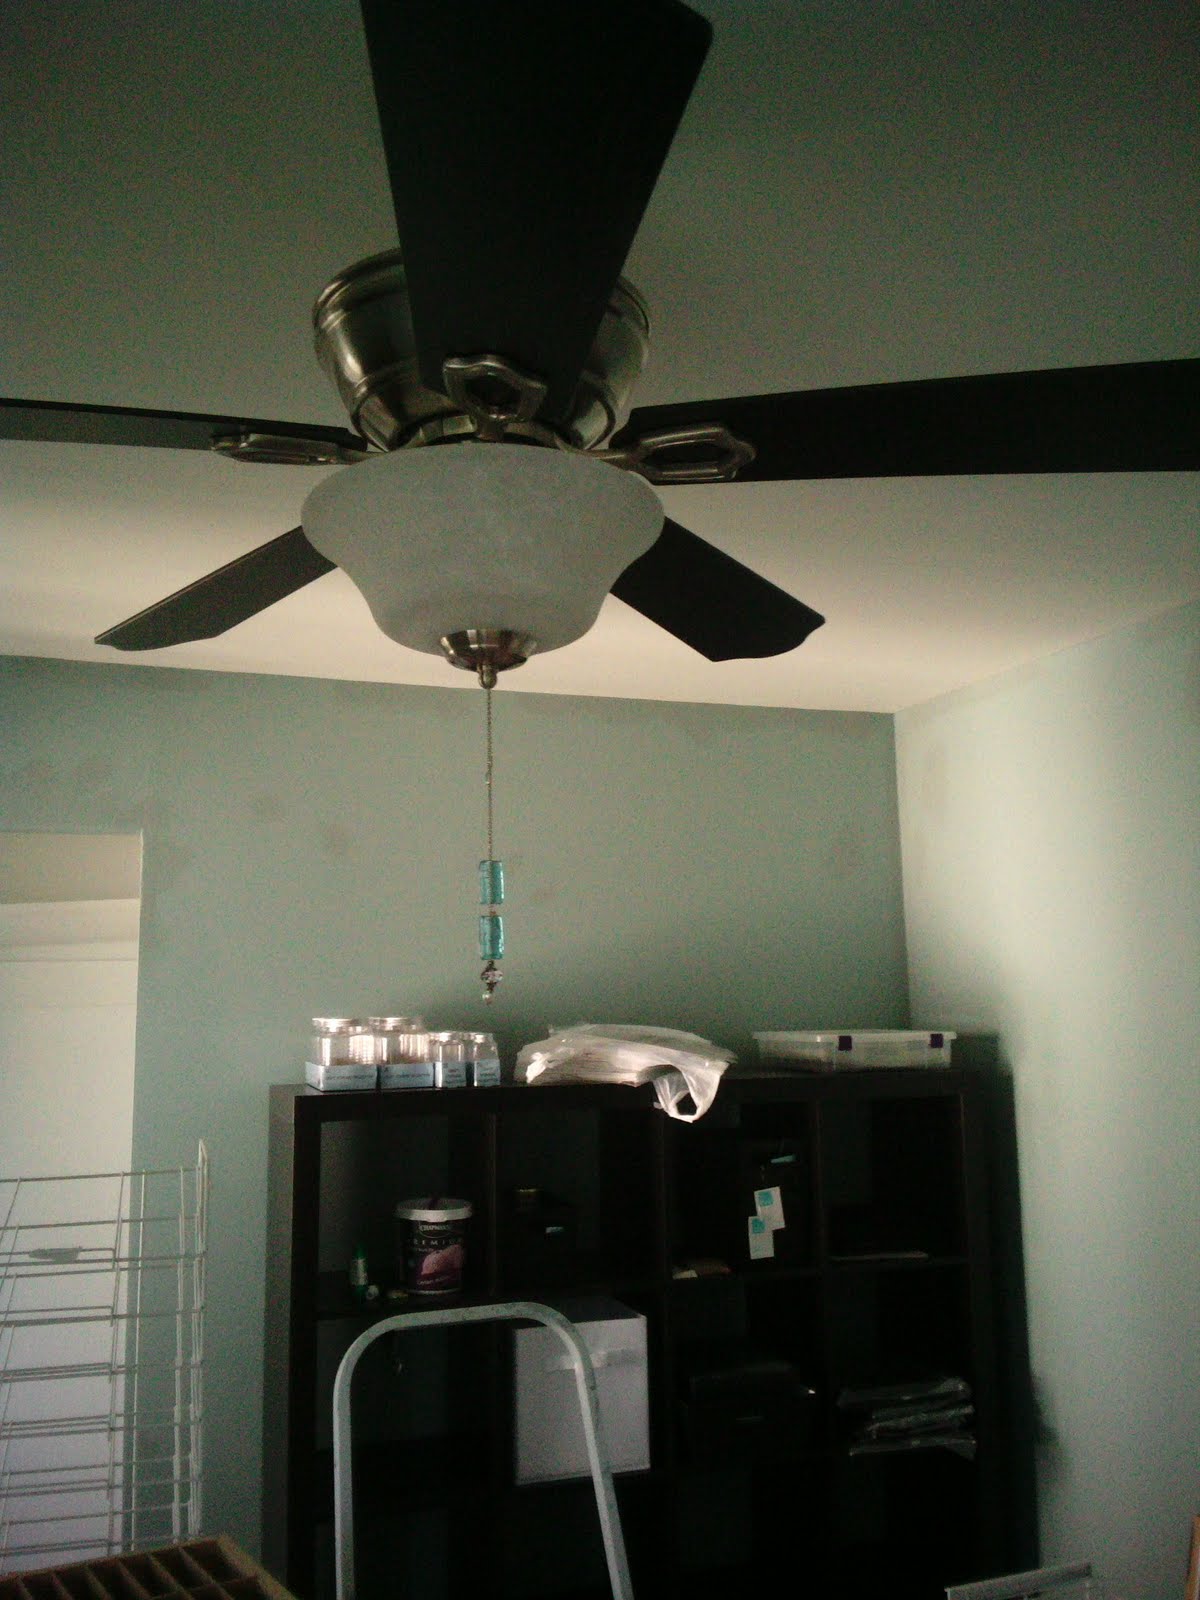
 The fan that started all of this!! I made my own pull thingies with beads from Omer DeSerres. If you look closely at the wall, you can see why I have to repaint the room. This was a 2nd matching attempt. The original colour is gorgeous, but someone at the store put the wrong label on the original can and now they cannot match my colour!!! I have chosen another very similar colour from their paint swatches.

This used to be my daughter's room and I had found this switch cover years ago when we first moved into our house. Her room was the very first room we painted (and made our mistakes in) and this switch cover was for her.


Once again, I was inspired by a layout done by Nicole Magouirk. She and her family went to South Dakota on vacation and I have many pictures from the same areas because my sister lives in South Dakota. I have lots of shots of Mount Rushmore, scenes from the Badlands (including at sunset), pictures of our fun activities like tubing, bumper boats and go karts, and lots of incredible scenery.


I will be using this layout as a title page for an album with all kinds of photos from our many trips there.


I used my Silhouette to cut the South Dakota frame. The "fun" and "Wet & Wild" texts were cut from heavy water colour paper with my KNK.

The stamps used are Ali Edwards stamps -- love, love love Ali Edwards stamps and cannot get enough of them.

Just be sure you have some time on your hands before you click the links to the blogs of Nicole and Ali. I guarantee you will want to spend some time looking around ... be sure to save the bookmarks!!!
I have started organizing the photos for my heritage layouts.

Amazingly, my aunt (my father's sister), wrote on the backs of every photo she sent my father and it is from her information that I discovered that I had an uncle I never knew about and many other things. Before I can scrap most of those photos, I will have to scan them, but I will also have to scan all the backs of the photos and use the texts for my journalling blocks.

The photos in this layout are of my father when he was in the German navy after World War II.

I found it difficult to find paper that worked for a navy theme, but then found this paper with constellations in an October Afternoon collection. I was telling our house guests about how difficult it was to work on a navy layout and one of them suggested compasses, ropes and anchors. Of course!!! The anchor and rope in this layout are from the Cricut Pack Your Bags cartridge.
I finally completed my Soccer Buddies layout. It has been on my mind for quite some time and now I'm happy with the result.

For those who know my husband, it would have been unthinkable that a dog would be sitting beside him on the couch, much less to see his arm around the dog. Well, things certainly have changed around here!!!!

It's all about the dog now :)))

I created the "soccer buddies" title with Make the Cut and cut it out with my KNK Maxx (the best cutter on the planet). I used my Silhouette to cut the soccer picture frame and flaming soccer ball.
My major project these days involves working on my scrapbooking studio. I recently purchased the furniture for my room and finished sanding and washing the walls so I could start painting. I am hoping to start that this afternoon.

Once I am done painting, I can start putting my Ikea Expedit units and other pieces together and then move all my scrapbooking stuff into the room. It is going to be a huge job, but I will be very happy when it's done.

Of course, it's much more fun to create so instead of getting to it yesterday, I worked on this small mirror I had purchased at Ikea. I used a photo of my brother, sister-in-law and niece and will hang the frame in my studio -- when it's ready! I plan to make many more similar items to decorate my room.

I used my Cricut and my Silhouette for this piece.

The frame and it's background were cut with the Cricut Lite Lacy Labels cartridge, but I cut some of the inner parts off by hand because they covered my brother's face. I ran the background piece through my Cuttlebug using the Victoria embossing folder.

I used my Silhouette to cut the Time Spent Together title and had purchased the word art in the Silhouette Store.
I was a divorced single mom until my son was about 8 years old ... and then I met my husband (we have been together 26 years now).

Anyway, my son needed a regular male influence who could spend one-on-one time with him so we registered with the Big Brothers organization. My son had a lot of fun with his "big brother", but it didn't last very long before I met my husband and he had his very own, permanent and wonderful male influence who became his DAD.

What a wonderful organization for children who need this!!!


I used bits and pieces from a number of different collections, including Echo Park Dots & Stripes and Crate Paper School Spirit, but also a piece of dictionary paper and computer journalling. I cut "winter" and "fun" with my Silhouette SD. The numbers for the year 1985 are from a bingo card that was used as packaging for some Crate Paper ribbons.
This mini album page is available as a cutting file in MTC, SVG, KNK, GSD and WPC format to members of my ScrapperCreations Community. Full details are available on the site and many more files will be shared soon.

The cutting file formats can be cut on Klic-N-Kut (KNK), Silhouette, Gazelle, Pazzles, Wishblade and other machines.
I just love how Percy is looking up into my daughter's eyes in this photo.


He weighed 8 pounds here and already weighs 15 pounds now. We have had him just under two months.
On May 7, 2011, Percy joined our family. He is the most precious and adorable Cocker Spaniel puppy. People actually stop in their cars to tell us how cute he is, but of course, we already know that!!

I really get it about dogs now.

Something inspired me to make a card today. I'm not always happy with my cards, but I'm very pleased with this one. It actually took a lot of time because I cut all the shapes by hand, except the one on which I stamped the sentiment.

For some reason, this one just came together as I worked on it. I love it when that happens!!!

I used some of the Stampin' Up! designer papers I have in my stash and two Hero Arts stamp sets for the flowers and leaves.


After cutting out all the shapes, I glued the leaves directly to the card front and used dimensional foam to attach the flowers. I used black pigment ink and embossing powder for all my stamping and then heat embossed the images. I used an embossing pen to add dots of embossing fluid to the centres of the flowers and then used Zing metallic embossing powders to give them a bit more pop.
Below is a picture of the ATCs I made for this swap. I ended up using quite a few of my favourite techniques, including resist embossing, ink blending, die cutting, using embellishments, distressing with inks and crackle medium and misting.

I also recycled the base for my ATCs because I had originally used the larger piece for another project. The piece in question was a part that did not turn out the way I wanted so I put it in a box of scraps for future use. It was perfect for this project and just required a bit of glimmer mist to liven it up.

The next picture shows how I die cut my name with my Silhouette for the back of the ATC. The Silhouette is perfect for very intricate and small cuts like these.

I am just waiting for the ATCs made by Marie and Paula and then will send one out to each of them and keep a set for myself.
On May 7, 2011, our lives were completely turned upside down with the latest addition to our family, Percy -- a 3-month old Cocker Spaniel puppy. It's hard to believe that more than a month has already gone by. Time really does fly when you're having fun (and when there aren't enough hours in the day ... seriously!!)

We took Percy camping last weekend and he had a fantastic time. He loves car rides, people and the outdoors. We were a large group of people because we were celebrating my brother's 50th birthday and the camping weekend with family and friends was my sister-in-law's surprise for him.

Percy was one happy little camper!!

The photos in the layout are my husband and Percy. He is very active, but he also calms down very nicely. He has such a nice little personality.

I am hosting a Favourite Techniques ATC Swap.


There will be no RAKs (random acts of kindness) or extra ATCs or gifts for the hostess. Some people host swaps and expect these types of extras so I just wanted to clarify this.

We currently have 10 members in the ATC swap group in the ScrapperCreations Community, but if anyone else would like to join in, please do so. All you will need to do is join the ATC swap group at http://scrappercreations.ning.com/group/atcswaps and then confirm your attendance in the Favourite Techniques ATC Swap event. 

This swap is open to Canadian and US residents and is open to everyone who confirms attendance in the event by Friday, June 17, 2011 at midnight Montreal time.

The swap will start on Saturday, June 18 and the ATCs should be mailed no later than Thursday, June 30. I will start posting photos of the ATCs as they arrive.

Details for the swap:

1. The ATC (artist trading card) must be 2.5" x 3.5" (standard ATC size). You can use a base of chipboard, acrylic, card stock or any material of a similar thickness or weight.

2. You must include at least one favourite technique on the front of the ATC, but you may include as many favourite techniques as you like. Please do not use anything thicker than a regular button as embellishments. Remember that the thicker you make each ATC, the more you will pay in postage.

3. You do not need to decorate both sides, but if you are not decorating the back, please make it look finished.

4. Include your name on the front or back using the name you use here on ScrapperCreations so the other swappers know who created the various ATCs. You can use a stamp, die cuts, stickers, handwriting or any other method to write your name.

5. Each person will make multiple ATCs, keep one and send the rest to me along with the amount of postage (Canadians) or cash (closest dollar bill) required to send your ATCs to me so that I can send the different ATCs to each swapper. Only Canadians can send actual postage because I cannot use U.S. postage to mail from Canada. If you do not want to send cash, please send the amount required to me via PayPal (send to kadamczyk_paypal@macroconsulting.com). I will confirm the number of swappers participating on Saturday, June 18.

6. Be sure to include your full name and return address on your envelope or parcel so that I can send your group of ATCs to you. Please place the ATCs in a plastic bag or wrapping to prevent weather damage.

7. After you make and send your ATCs, please post details of the techniques you used here as a reply to this discussion.

8. You can use any theme you like.

Please remember that others are counting on you. If you decide to join in, please send in your ATCs on time or let me know if something has come up so I can let the others know that they should make less ATCs.
That's it. Keep your eyes open for the Favourite Techniques ATC Swap.

Take care,
Karin
One of my scrappy sistas wasn't able to use water over the weekend due to a problem with the city water supply so she came over to do a bit of laundry. It was a perfect excuse to work on some layouts and chat :)))

I worked on the layout below using the beautiful BoBunny Sophie paper collection.

The "gorgeous" title is from the Silhouette store and cut with my Silhouette SD.

At the request of a member of my ScrapperCreations list, I am posting photos that show how chipboard cut with a cutter can be used and what you can do to the pieces to use them in projects.


I glued paper on after cutting out the chipboard, filed the edges, inked the edges, ran the piece through my Cuttlebug with an embossing folder and covered it with Crackle Accents. I spread the Crackle Accents with my finger and let the piece dry overnight.


I used the same techniques for this piece and the next piece.


I don't remember the name of the paper collection, but it was by Fancy Pants.

Note that the scalloped piece was cut from recycled plastic packaging and I cut the same shape from matching paper and put it beneath the clear plastic. You can see some white swirls next to the heart -- these are white Staz-On ink stamped on the plastic.

The smaller blue and red hearts and I Love You are rub-ons. I dressed up the letters a bit by doodling dots with my white gel pen.

This project was a special Valentine's card I made for my husband.
I am working on my son's baby album. I don't have many pictures because I did not have a camera in those days and digital cameras did not exist yet. The album size is 8" x 8". I find this size more challenging because photos usually take up a large space, but the few pictures I have are fairly small or can be cropped to work in this size.

I used various sticker elements from my stash of mainly Echo Park and Bella Blvd. collections.

I tried some stitching on the semi-circles at the ends, but it did not work out so well on thick paper so I covered up my mistakes with some punched circles. That's one of the fun things of this hobby -- figuring out how to cover up the mistakes you want to hide :)

I punched some multi-coloured circles for the side of the photo and just glued them on.

The circle with cars and the LITTLE BOY stickers was cut with my circle cutter and then I cut a circle out of the same size in vellum to tone down the colours here because I originally wanted to write something on here. It was actually still a bit to busy for handwritten journaling so I used some stickers. I also stitched around this circle with my sewing machine. I used a shiny embroidery thread, but because it is dark blue, that doesn't show.

The brads at the bottom left are stamped with little stars. I used black Staz-On and coloured in the stars with Copic markers.
Robin, My Pink Stamper, is having a Pinkalicious Blog Hop and her daughter Katelyn is celebrating her birthday so she is having a challenge in which you need to create "anything birthday". Since I need to practice my card-making skills, I made this card for Katelyn. Happy Birthday Katelyn!!!


I used my Cricut Wall Décor and More cartridge to cut out the butterfly, the Kaisercraft Bubble Gum Hills Collection 6-1/2" paper pad and a paper doily from Wilton. Light purple Stickles and gems are the finishing touches. The card base is 4-1/4" x 4-1/4" square. I also used my Fiskars scallop punch, two teeny-tiny punches from Stampin' Up and a couple of Spellbinders label dies. The sentiment is a rub-on from my stash.
One of my Scrappin' Sistas organized an all-day crop this weekend and we had a fantastic time. The hall she rented is huge -- big enough that we could each have an entire table and there were still enough tables free to sit and eat. She plans to organize more soon and I'm really looking forward to them!!!!

This is another layout inspired by Nichol Magouirk. The photo is a class picture with my son taken 27 years ago.


It was funny because when I glued all the strips onto the page, I thought it looked terrible, but once I added all the other elements, I really liked the result.

I used both my Cricut and Silhouette machines on this layout. I cut the clouds with the Create a Critter Cricut cartridge and the word Elementary with my Silhouette. 
I totally scraplifted this idea from Nichol Magouirk. She does a weekly series of From Start to Finish videos at Two Peas in a Bucket and I wait for each new video. I just love how she shows putting everything together and she uses many elements in her layouts.

I find it fairly easy to get ideas for layouts for girls or families, but it's harder to find ideas for boy layouts. Luckily for me, Nichol has a son and her layouts are perfect for boys.

She inspired me to learn more about using Photoshop and Photoshop Elements and I have been wanting to learn more about them for some time.

You can see Nichol's videos on the Two Peas in a Bucket YouTube channel at http://www.youtube.com/user/TwoPeasInABucket and you can visit Nichol's blog at http://www.nicholmagouirk.typepad.com/
... be careful, make sure you visit these sites when you have a bit of free time ahead of you!

You really can use ribbon on a boy's layout
Last weekend, we went to the St. Patrick's Parade in Montreal and really enjoyed ourselves. There were so many people, you'd think a rock star was in the area!! I brought my camera and took lots of pictures.

Since I was very young, I have always loved parades and marching bands in particular. The music from parades actually makes me cry. I absolutely love the drums. So much so that I finally gave in to a dream I'd had for a long time and started learning to play the drums. I only love them more now.

It is normally pretty cold for the St. Patrick's Parade in Montreal, but it was just beautiful last weekend -- nice and warm and sunny.


My husband and I went walking in a nearby wooded park. It truly is a winter wonderland in there.


I used the BoBunny Midnight Frost paper line for these layouts. They add to the magic of these wintery photos. I used the Cricut Quarter Note cartridge to cut out Breathtaking. The cursive font is ideal for welding.
This layout shows my drumming teacher playing at the Montreal Jazz Festival last summer.


I used the Cricut Quarter Note cartridge for this layout and love, love, love it. I plan to use it for many more layouts.
I finally finished my 8 x 8 Gaspé album and am quite pleased with it. I got ideas from a number of places and included my own ideas as well.
Click on the picture to view more detail in a larger version.

It's funny how you can have such different memories of the same event.

We camped at a different location every night. In the beginning, we were very good about packing up carefully, but after a few days, we were quite sloppy and I can remember loose potatoes rolling around in the trunk.

My sister remembers almost driving off the road because she tried to tune the radio that was not attached to the car. I had bought my first brand new car and was so excited, I insisted on having the one on the lot despite the fact that it did not have a radio. I did not want to wait an extra day for them to install the radio so I just brought a radio in the car and put it between the driver and passenger seats. Of course, reception was terrible and it was very inconvenient. If you look closely at the first camping picture (first picture in last row), you can see the radio on the picnic table. It was versatile LOL.

My son was eight years old on this trip. He is now 33.

We drove through the Chic Choc mountains -- they were so beautiful, but the roads were terrible and we were in the middle of bear country!!! We saw logging trucks everywhere.

What an adventure!

My husband and I are planning to drive to Gaspé this spring or early summer. This time I will take many more pictures.
People keep asking me about my favourite tools and how they can reach me. I decided to put all this information into one post so I can refer people here when they ask these questions.

You can find me at:

My blog: ScrapperCreations (http://scrappercreations.blogspot.com)
My Twitter Updates: scraprcreations
My YouTube Channel: ScrapperCreations
My Facebook page: ScrapperCreations
Mailing Lists: CricutScrapLifters (over 3,000 subscribers), CricutImagine, GypsyUsers, CricutCake and  Cricut DesignStudio (links for signing up are in the sidebar)
---------------------------------------------------------------------------

What program do you use to edit video?
I usually use iMovie

What video camera do you use?
I use a Sony HandyCam

What camera do you use to take photos?
I use a Canon G9 and absolutely love it.

Favourite Tools:
Cutting Mat - bright pink magnetic mat (We R Memory Keepers)
Corner Rounder Punch - Corner Chomper (We R Memory Keepers)
Scissors for ribbon - green scissors from the Cricut tool kit (Provo Craft) (they stay super sharp because I ONLY use them for cutting ribbon)
Scissors for cutting out shapes - Paper Snips (Stampin' Up!)
Scissors for everything else - what else?? Tim Holtz scissors
Adhesives - ATG gun (both 1/4" and 1/2") (tape runner), Tombow Mono Multi Glue (liquid glue), assorted glue dots and foam dimensional adhesives from various manufacturers.
Circle Cutter - Circle Scissor Plus (EK Success) and Simple Circle Cutter (Martha Stewart Crafts)
Paper Cutter - 12" Guillotine Trimmer (Tonic) and SureCut™ Deluxe Craft Paper Trimmer (12") 
White Gel Pen - Signo Broad (Uni-ball)
T-Square Ruler - purchased from Omer de Serres (Montreal)
Digital Cutting Machines - Cricut Expression and Cricut Imagine
Diecut Machine - Big Shot (Sizzix) and Cuttlebug (Provo Craft)