Showing posts with label Silhouette Cameo. Show all posts

If you have been a user of Silhouette Studio for some time and need to install it on a new computer, along with all of the cutting files you purchased from the Silhouette store, this information is for you.

(the link above takes you to the page on Silhouette's web site where you can download the software)


At this time, I am giving back to all of my YouTube subscribers in the form of a $25 coupon for anything in my Ecwid store. There is no purchase required whatsoever -- you can go in and order up to $25 worth of cutting files and fonts and not pay a penny. The only restriction is that each person can only use the coupon once. This will go on until the end of August. I just want to hit that magic number of 100,000 subscribers!

To get the coupon, first subscribe to my YouTube channel at https://www.youtube.com/user/homevidka ... then send an e-mail message to me at scrappydiva@macroconsulting.com ...

You must use the words YouTube subbie in the subject line exactly.

If you have just subscribed, I will be able to match up your e-mail message and the notification I receive from YouTube. If you were already a subscriber, send me a screen shot or photo of your screen that shows you are subscribed to my channel.

Please understand that the point of this is to increase my subscribers so you must be subscribed when I check. Once I have been able to check, I will send the coupon code to you with instructions. Thank you so much for your support.
In this SCAL tutorial, I teach you some cool tips for creating a compound path in SCAL, welding text to frames and I use the rhinestone feature for a fun effect.


In this Silhouette Cameo tutorial, I teach you how to use Tagul to create word art and then draw a line around the shape in Silhouette Studio to print and cut the design. I also walk you through downloading and installing the firmware update for the updated Cameo. Note that you need the firmware update to do print and cut projects with the new Cameo.


In this Silhouette Studio tutorial, I teach you how to create a compound path to weld letters or shapes inside frames and cut with your Cameo or Portrait.

The frame I am using in the video is available as a free SVG file in my Silhouette SD and Cameo Users group at https://www.facebook.com/groups/silhouettecameo/


In this Sure Cuts a Lot tutorial, I show you how easy it is to create designs for tumblers using the Wrapper function.


People kept asking me which machine I thought was the best between the Silhouette Cameo and the Cricut Explore so I conducted some of my own tests cutting shrink film, acrylic, chipboard, corrugated cardboard and cork and posted a video with the results.

After those tests and after using the Explore for several months, which was after using the Cameo for nearly three years, I concluded that the Cricut Explore is the machine that can cut the broadest range of materials, the thickest materials, the densest materials and do so very accurately, quietly and easily.


A lot of people in the Silhouette community pooh-poohed my video and insisted that their trusty old Cameo was the better machine. It might HAVE BEEN the better machine for a while, but things have changed.

The new Cricut has taken the crafting community by storm.

And now, just before the new iPad app is launched and before much more exciting new is launched, the results from an independent engineering firm have been released and the results can no longer be denied or pooh-poohed.

There is a reason people are threatening to throw their Cameos out the window! I have seen so many make this very comment.


While Cameo users have to be content cutting vinyl, but not for too long or using too large designs, Cricut users are playing with just about every material under the sun.


It's kind of ironic isn't it how only about one month ago Cricut users were rejoicing about the announcement of the new iPad app while Cameo users were bitterly disappointed with the announcement of the new Cameo that really had nothing more than a few cosmetic changes.

See for yourself. The full reports are available here.

Materials Report
Precision Report
 
Here is what has changed on the "new" Cameo:

New look, all white with a full colour LCD touch screen
Help on LCD screen
Steel spring rollers to prevent compression marks on sensitive materials
Built-in cross cutter at back to cut vinyl so you don’t need to remove the roll of vinyl from the  machine
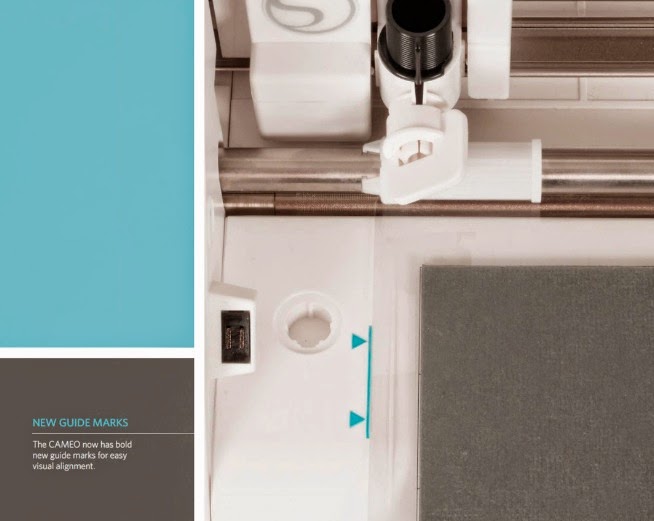
Guide marks for inserting the mat are more prominent
USB port rather than the SD card port for cutting studio files without a computer
Storage compartment for spare blades
Sleep mode

    Click here for a video to see all the new features.


    So many people have been asking me which machine I would recommend because they know I have extensive experience with both.

    This video shows you the types of thick materials the Explore can handle.

    My recent videos on applying vinyl to a Christmas ornament and on re-organizing my kitchen pantry show you how versatile the Cricut Explore really is. It can cut the thinnest materials, such as vinyl, vellum and copy paper, to the thickest materials you will use in crafting, such as shrink film, acrylic, heavy chipboard, ripple board, poster board, foam and cork.

    Silhouette claims the Cameo can cut chipboard, but the material they sell as chipboard is actually a medium weight kraft card stock. I have had some and was very disappointed.

    In any case, this video clearly shows you that the Cameo is incapable of cutting the thinnest material I show here.


    Simple for the experienced, but when you first start working with Silhouette Studio, these are critical settings that you need to be able to find.


    I am working on some designs for my store and wanted to share these pictures that show how intricately the Cameo can cut vinyl with the right settings. If you look at the grid on my mat, you will see that the main parts of the words are 1/4" in height.

    I will share my personal settings, but because every machine is slightly different, you should use my settings as a starting point, but then test with a small design on your machine with your materials. You might need to make some slight adjustments for your machine.

    My blade is not brand new. In fact, I have been using it for several months. I always cut with a mat when I cut vinyl with my Cameo because I find it inevitably starts to take the vinyl through the machine crooked if I don't.

    Note that I always use Oracal vinyl. This cut was made using 631.

    I am using the setting for Silhouette Vinyl in Silhouette Studio, version 3. My blade was set to 2, I changed the speed to 6 and the thickness to 7.

    Below is a close-up of the result.


    I decided to modify my file for customizing the control panel on my Cameo to include two little holes so that the power and pause lights show through.


    You can download my cutting file by clicking *** here ***
    I have been wanting to make a "drummers rock" sign out of vinyl for my bumper for the longest time. Well, I finally got it done and I was able to make some good looking drumsticks by tracing a JPG file with one stick, editing it so the lines were straight and everything looked right and then copying it and rotating it to have two sticks.

    The text and sticks were cut with my Silhouette Cameo.

    The weather will have to get a bit better before I can put it on my car, but it will look very nice. My car is a white 2-door Honda Civic. I will post a picture once I put it on my car.


    I will put the sticks on the left side of the text.

    I just put it on my car! You can see where I wiped away the dirt. It's such a gorgeous day and all the snow is melting so I couldn't resist.